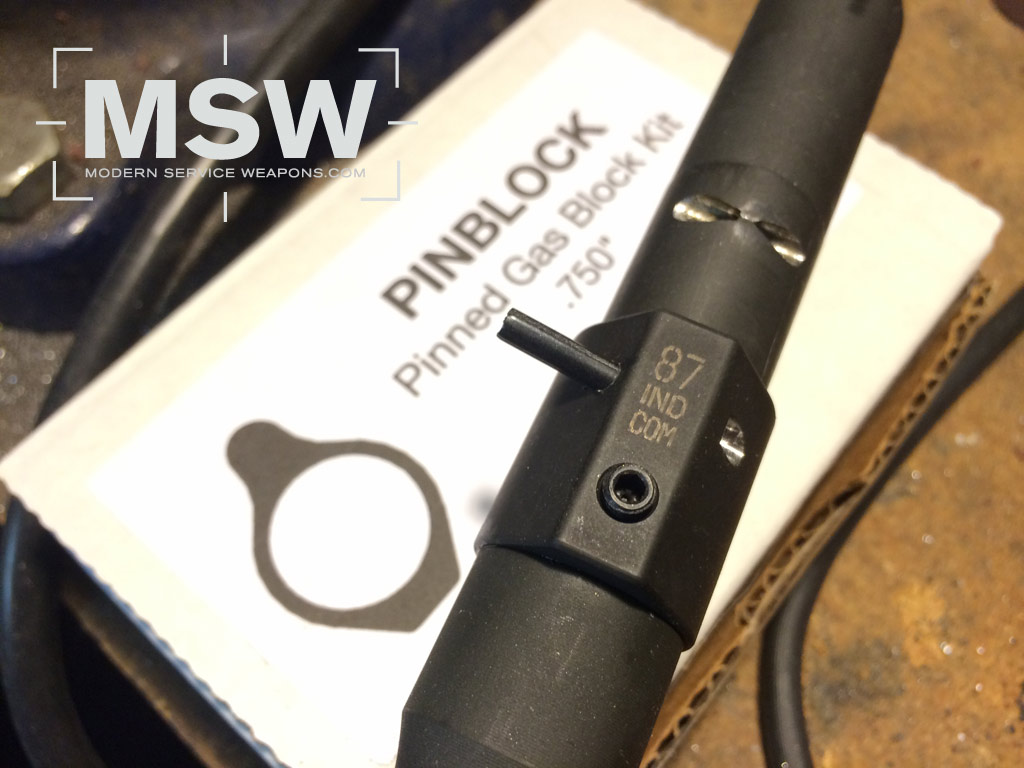
The Pinblock Pro from 87 Industries allows a home armorer to drill and pin their own AR15 gas blocks with a vise and hand drill.
For a working gun, I am a big proponent of pinning the gas block to the barrel. Yes, there are excellent factory guns, such as those offered by LaRue Tactical, that attach the gas block via set screw. Having been at the LaRue shop more than once, I can say that their QC methods are better than 99% of anyone slapping together rifles in their garage. I have not seen a LaRue OBR or Stealth come apart at the gas block, but I have seen gas blocks on other rifles work their way loose on the range. These days, gas blocks are typically hidden underneath an extended hand guard and checking the set screws for tightness is not easy. Suffice it to say, for a gun that I am building myself, I want my gas blocks pinned.
Unfortunately, in the past, this meant sending my barrel off to a shop to have the gas block pinned. This wasn’t too expensive, but sure was inconvenient and didn’t satisfy my need for instant gratification. Thankfully, 87 Industries has come onto the market with their end-user-installable Pinblock Pro. This kit includes a very nicely machined, low profile gas block machined from super resilient 17-4 Stainless Steel, which is then blackened before shipment. The kit also contains a set screw to secure the block for indexing, a hex wrench for the set screw, a 1/8-inch cobalt drill bit, a cross pin, gas tube roll pin, and some Loctite.

The Pinblock Pro includes all the bits you need to pin your own low profile gas block to your barrel.
A while back, the folks at 87 Industries sent a kit out to me to prove how easy it was to install. It languished in my parts drawer until the next build project. I started with a service grade complete upper receiver from Palmetto State Armory. I have had great success with these inexpensive uppers, which come with either a button rifled or cold hammer forged barrel made by FN. I have found the button rifled barrels seem to shoot a bit more accurately than the cold hammer forged ones, and I have enough guns now where it isn’t conceivable that I will wear out all my barrels before my time on the planet is up.
So I disassembled the upper, first by removing the A2 flash hider and then pushing out the taper pins on the standard front sight post. Then it was time to set up the gas block. I slid the block onto the barrel until it butted up against the shoulder, ensured the top was at top-dead-center, and tightened the set screw. The Pinblock has a nice flat machined into it along with a small pilot to get the bit started. Using a hand drill, I was able to drill a straight hole right through the Pinblock, barrel, and clear the opposite side. It took just a few minutes of careful work.

A bench vise, vise jaws, hand drill, and some elbow grease is all you’ll need to install the Pinblock Pro.
I haven’t shot this particular upper yet, as I am waiting on a few more parts to get the thing together. However, the hard work is done. The Pinblock comes with a grooved dowel pin to secure the gas block. Pretty easy. Actually, the hardest part of this project was getting the freaking barrel nut off. The folks at Palmetto State Armory torqued that barrel nut on there to about 6 million ft-lbs. After much swearing and cranking, I ended up having to cut the barrel nut off, but that is a story for another day.

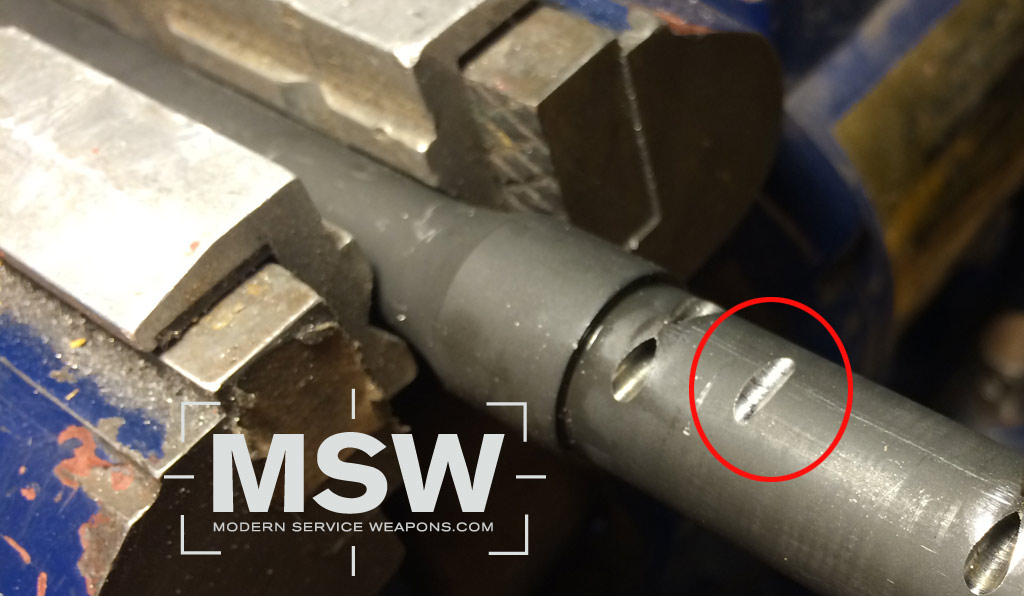
The circled portion is the relief for the Pinblock’s cross pin, drilled by hand. This barrel originally came with a standard fixed front sight post.
If you find yourself building another rifle or upper receiver, and you are in need of a low profile gas block, don’t settle for one that is secured with just a set screw or a clamp. Get it done right. If you don’t want to send out your barrel, check out the Pinblock Pro from 87 Industries and do it yourself!
SOURCE: 87 Industries


After your mention previously about PSA’s quality uppers I bought two of them with CHF barrels. One in 556 and a pistol lenght action 300BLK and both without BCA’s as I had extra Bravo Machine BCA’s to install along with Bravo buffer springs. I have seen lots of negative views on the error net about PSA’s quality of build esecially high torquing without grease on the barrel nut, but I figured I would give them a chance especially with FN barrels. I have not shot either yet and for the record my other AR’s are Colt’s and Bravo’s. Hope to see your range reports soon!
PSA is not the only manufacturer to torque the barrel nuts down tight. I remember a well known and regarded manufacturer (not Colt or BCM) that overtorqued the barrel nuts because the receiver hole was slightly out of spec and the barrel extension fit loose in the receiver. Rather than not use the receivers, they just torques the nut down like crazy in order to mitigate any accuracy issues. Anyway, I now have a 2 foot breaker bar which, along with PRI’s barrel nut wrench and a Geissele reaction rod, makes those stubborn jobs much easier.
PSA barrels are from FN but they are built to PSA’s specs.
Is that a positive or negative input? Could you elaborate on spec’s PSA uses that are different.
Both PSA uppers I have owned prior to this project were built with FN produced button rifled barrels. They were both reliable and held about an inch at 100 yards with Black Hills 55gr Blue Box.
A cheaper alternative to the 2′ breaker bar is a 3 foot section of plumbing pipe over the handle of your normal ratchet. This puts less initial stress on the receiver when removing an over-torqued nut and it allows for fine micro adjustments while installing the new barrel nut too. When installing I’ll hit it with my torque wrench to begin, get to the required spec but then if the gas tube would still be obstructed (almost always is) I then use this method to get it right on without over-torquing. And yes I always use the anti seize 🙂
Dave, thanks for the advice. I got my breaker bar for $12 on sale at Harbor Freight so it didn’t break the bank. An easy but not very elegant way to ensure proper torque without “stretching” the threads is to get to your desired torque setting with your wrench (between 30 and 80 ft lbs is spec) loosen and reseat a couple times. If gas port is still obstructed, I just use a rotary tool to grind the one barrel nut tooth off. Barrel nuts are cheap. May not be a great option for an OEM manufacturer, but for building my personal guns, I am fine with it.
ETA: I use a Geissele Reaction Rod to eliminate any stress on the upper receiver when working with the barrel nut.
That will work but not with every handguard. I like the troy alpha rails for the weight savings and those require a perfectly lined up barrel nut. You can get a civilian legal length M4 down to 5 and one half pounds with the help of that rail. That and I actually am an 07/SOT oem manufacturer who mainly builds for LEO and SWAT but on occasion civilian stuff too.
Tim, have you any experience with PSA’s $149 lowers? I bought one for my 300 upper and put on a Bravo buffer spring and ergo grip. I was debating to try the trigger or throw in a wilson and call it good. As mentioned earlier I put in Bravo BCA, Aimpoint Pro, what is your opinion for my entry into the 300 world with that combination and Barnes black tip (Tac X i think ammo). I have other 556 AR’s as in Colt and Bravo models, just trying PSA brand and 300 experience. Thanks
I havent personally used any of the lowers from PSA and other than the tight barrel nuts, the PSA premium grade uppers have performed very well for me.
Great article, Tim. I just completed a Noveske build and their gas block was already drilled, so pinning was easier. I do have a pair of “truck guns” I assembled and should go back and pin the ga bloks.
Just at the eve of the last “scare”, I obtained a couple of PSA lowers to keep on hand. They were $98.00 and I also purchased some lower parts kits, as well. The lowers were built right and the LPK pieces all within spec. Though I also have seen Internet talk on problems with PSA, I saw no quality control issues or problems. Buy lowers and parts now, before the next scare.