
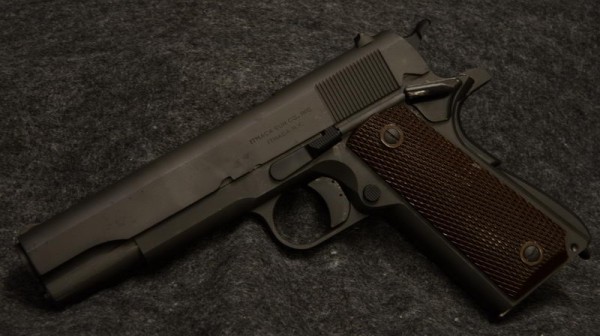
While perusing the inventory at my local gun store, I discovered a used 1911. It consisted of a Caspian frame and a vintage Ithaca slide. The gun was completed with an assortment of vintage and modern small parts. The slide is a WWII era production with “P” Proof and Ordinance Marks. The Ithaca rollmarks were shallow and the slide had a few dings and had been arsenal refinished over the years.
Being that the slide and frame were mismatched, I decided to use it as the canvas for my first build. I had worked on 1911’s over the years, and I am a certified 1911 armorer, however this was going to be a first and would be done completely by hand. Files, Emery Cloth and the occasional Dremel tool would be the only tools used. I decided to make the pistol a Retro Build, keeping the classic lines while incorporating modern features into the pistol. My inspiration was actually Hilton’s Delta Build. (And I DO NOT compare my work to Hilton’s).
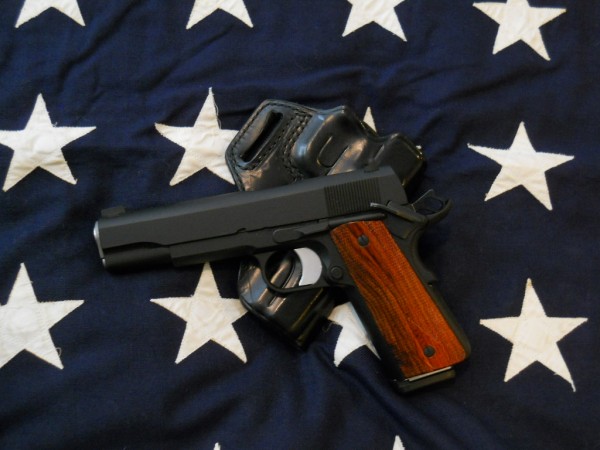
Work began with a complete detail strip, detail cleaning and inspection. The parts list consists of an Ed Brown Stainless Match Barrel and Bushing. All Ed Brown Hardcore Parts. Wilson Combat Grip Safety. 10-8 Brass Bead Front Sight and NM Rear Sight. 10-8 Gen 2 Slide Stop. Greider Long Match Trigger. Cylinder & Slide Professional 5 lb. Duty Trigger Set. Les Baer Flat Mainspring Housing and Ahrends Cocobolo Grips. The only original parts are the Slide, Frame, and Grip Screw Bushings.
I polished the slide flats to remove the dings and some rust pitting which was under the last parkerizing. Unfortunately that did remove the rollmarks. I was able to retain the Proof Mark and Ordnance Mark however. The ejection port was lowered and relieved, rear of frame and slide blended, as well as the grip safety. I beveled the magazine opening and matched the Baer Mainspring Housing to it, as well as contouring the corner of the housing. The entire pistol was dehorned. All parts were hand fitted and polished. I had a local shop cut the front sight dovetail as I don’t have a milling machine. I bead blasted the entire pistol and all parts The finish is Brownell’s Matte Black Aluma Hyde which was baked to final cure. I estimate that I have 150 hours into the build.
 I’ve shot a 5 shot 1 inch group handheld off sandbags at 25 yards with her. 4 of those shots made a one hole 3/4 inch group with my 200gr. LSWC Reloads.
My Dad was a WWII/Korean War Vet with 3 Combat Tours who survived due to a 1911 and knowing how to use it. He was also a real craftsman with anything he did with his hands. I’d like to think he was at my shoulder guiding my hands during this build. Thanks Dad.
Amazing. Simply amazing. Great story.
Thank you.
gorgeous pistol and story perfectly suited for independence day…
That is a very nice 1911. You did good work. Several years ago I fell into a complete Ithaca 1911 frame. About a year ago I bought a Colt A1 slide and barrell of another forum. I still need a few parts and someone with more 1911 knowledge that I to get it all together in working order. Again very nice 1911.
Nice job.
Bob is was a pleasure reading about your build-thanks for specifying the components you decided on.
Best, Jon Stein
Gorgeous, very cool gun. I am not an armorer nor a pistol smith but being addicted to tinkering and this blog I am starting my first build. It will consist of a Doublestar frame and Caspian slide with alot of 10-8, C&S, and Nighthawk parts hope it turns out half as good as yours. The contributors to the MSW.com blog have been a huge inspiration to me to give it a go. GOD BLESS THE 2ND AMENDMENT
Heath
My advice would be to study before you touch metal to metal and be very careful in the use of a Dremel Tool. Go SLOW and STOP when you get tired, frustrated, or when something isn’t going right. Remember you can remove more metal, you can’t put metal back easily. More than once I left the workshop with my fiance asking me if we still had a gun, or a paper weight. Best of luck.
Thanks to everyone for your kind words.